Claud Butler Cape Wrath 2018

After a long time away from the blog we are now back for the new season. We are starting with a Claud Butler Cape Wrath (2018) supplied by Tandem Group Cycles. The bike was sent to our favourite local bike shop High Peak Cycles of Glossop where the owner Jamie built the bike and prepped it ready to ride.

MVIMG_20180316_154020.jpg

The bike is a nice looking piece of kit and has a good level of spec including Rockshock forks with remote lockout, shimano triple alivio 27 speed with rapidfire plus shifters and shimano hydraulic brakes. Wheels are 650b (27.5″) booted with Schwalbe Smart Sam tyres and there are nice premium touches like anodised lock on grips and matching skewers. All done for a competative rrp of £699.99.

MVIMG_20180316_154007.jpg

The plan is to get the Wrath out into the Peaks and see how it deals with the technical and demanding trails that we have. Watch this space as the blog will be updated …

Tumble & Fall HALO Front Light

Dark nights and dark mornings are here for my commutes, so it’s an ideal time to test and review light sets. High Peak Cycles stepped up and asked me to take a look at the T&F ‘HALO’ lights. They are a 2000 lumen light with separate power (battery) pack, good burn times claimed and a budget RRP of £99.99 – given the specs. The warranty and the fact that unlike some of the cheap imported lights – these won’t burn your house down if you leave them on charge overnight – add to the appeal.

Once unpacked the quality and accessories are good. Aside from the main light and battery pack you get a helmet strap and head torch. Some basic instructions/ info are included in the box. First job – charge the battery up. Plug in and when red light turns to green (approx. 4 hours) we are good to go.

Fitting on the bike was very straightforward. The battery pack is a neat size and the neoprene case is well designed so you get a nice secure fit. The light is a simple design where you sit the light onto your bars and then use one of the two supplied O-rings to hold it in place.

A nice feature is that the connection point (from light to battery lead) clicks in place and then screws shut, so you know it is watertight. Settings are straight forward. Left button controls the outer Halo ‘rings’. Press once for a ‘solid’ halo (shown below) and twice for ‘flashing’.

20161108_073811

Press the right button and you can cycle through the main lights. Press once for low, twice for medium, three times for high and four times for ‘flashing’. One long press switches the lights off. The two lights (or halos) operate together.

So, lights on and out in the dark early mornings and evenings to test them. The test week saw temps down to -3 early on and later in the week very heavy rain which presented no issues to the lights. I ran the T & F Halo light alongside my Hope R2i light as I’m very familiar with it’s settings. I concentrated on using the ‘main’ lights on the halo. I stopped to test the lights on an unlit rural road. This is without lights (yes, seriously) …

20161101_051108

Halo Setting one. This gave a similar strength to the Hope 40 lumen setting.

20161108_051041

Halo Setting 2. This gave a similar strength to the Hope 200 lumen setting.

20161108_051105

Halo Setting 3. This is the 2000 lumen setting. The picture doesn’t do the power justice as it was considerably stronger than setting two and was more powerful than the Hope on its highest 1000 lumen setting.  It’s very bright and too powerful for constant road use.

20161108_051124

In use for my commutes I found setting one was too weak. I would be well suited to well lit roads, but is best considered a ‘be seen’ light only.

I found that setting two/ medium was just about sufficient for most of my commute, but did not cast enough forward light when I got to unlit roads or when I was travelling over 20mph / downhill and needed better warning of pot holes or grids. I needed to move to setting 3 (high / 2000 lumen) for those times. The full charge (mainly setting two) lasted 5 hours 26 minutes. The display then turned from green to red and the light died 15 minutes later, giving a total burn time of 5 hours 41 minutes which is a bit better than the claimed time. Never a bad thing!

I’m currently checking the burn time of using setting 3 (high power / 2000 lumen) and will add that information to the review in the next few days. *Update 22/11/16 – The light managed just over 2 hours on full 2000 lumen power. That was spread over three rides with a ‘gap’ of over a week between ride 2 and 3 as I was out of the country/manflu for a week. On full power the display light went red to warn of low battery, then shut down within a couple of minutes. 

After a week with the T&F Halo lights I’m impressed with the user friendliness and burn times. The output on high (2000 lumen) is very good. It’s a shame medium setting wasn’t just a bit stronger, but where necessary it’s just a case of switching to high setting then back to medium. The main light itself is only 98g (very light), so my next step is to try it out offroad as a helmet light.

I did have one niggle. Part of keeping costs down is the main light fixing. This is built into the light so you sit it onto the bars, then use a tight o-ring to keep it in place. As it’s a pre-machined size it was a little too small for my road bike bars. It sat in place ok until I rode over poor surfaces (vibrations), or pressed a button to change the light setting. It then moved forward a touch so it pointed down to the road more than I want. This won’t be an issue on thinner bars.

Overall, the T&F Halo lights do everything you would want for a set of lights at this price point – and a bit more. If you are looking to spend £100 on a set of lights then these should be at the top of your list.

LED Lenser XEO19R Front Light

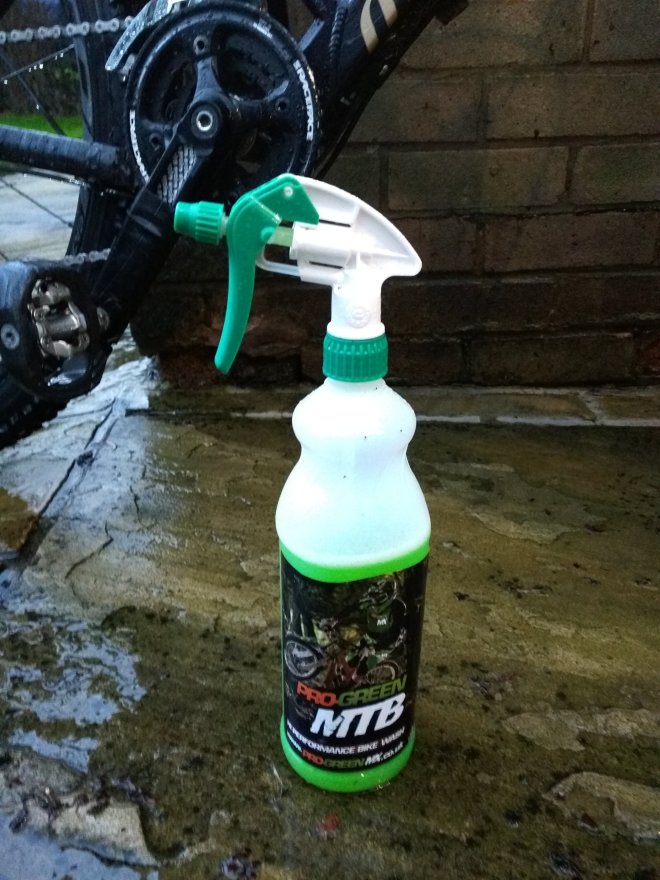
In June 2017 I/we (a team of four) have entered ‘Mountain Mayhem’ which is a 24 hour cross country race held every year in Gatcombe Park. AFTER getting our entry confirmed we worked out that each one of us would be doing at least two or three ‘night laps’. As Gatcombe is a mixed wooded course which takes 45 mins to 1 hour per lap depending on conditions (and rider!) then lights I have (an old Lupine Edison HID and a Hope R2i) would fall well short of burn time with not enough time between laps to recharge. We needed a powerful light with a burn time of over 2 hours 30 mins from one charge to be safe.

One of the team (Dave Robinson) runs his own business (Garage Tool Services) and sells LED Lenser products. He got a couple of LED Lenser XEO19R Lights so that we could see if they were suitable. I got one to test and review and have now run it for two weeks on my work commutes (road bike).

The LED Lenser light is sold in to different markets so comes with an array of accessories enabling it to be used for biking, walking, running or pretty much any activity you can think of. Full retail price is £249.

First job is to charge the battery pack up. Red is bad, blue is good!

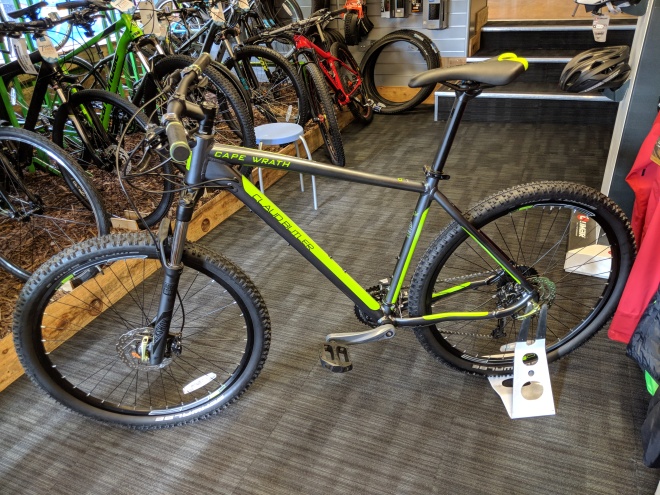
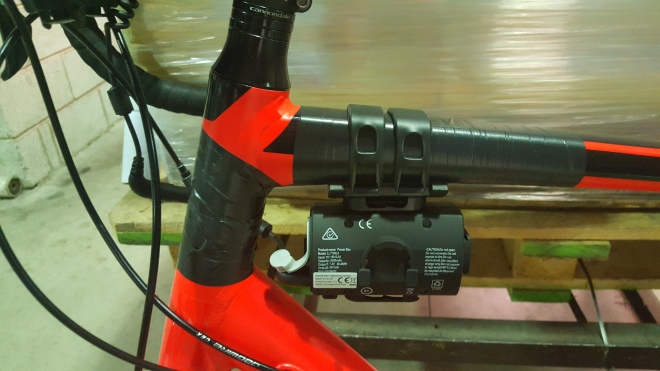
Once charged I used the bike (bar) accessory to mount the light. I preferred this to helmet mount for road use as it could be pointed down toward the road to avoid dazzling other road users. I taped the bike first …

20161019_18063920161019_18065720161020_06131420161020_061343

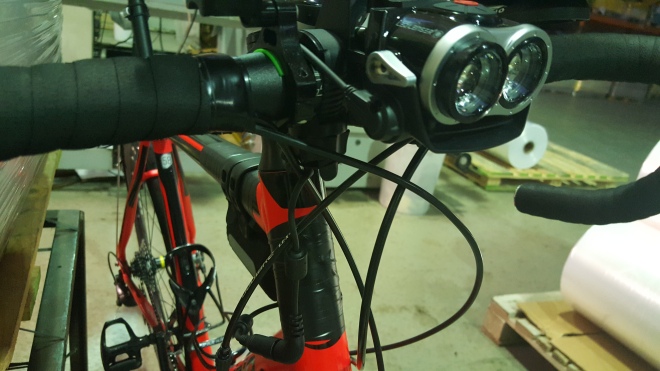
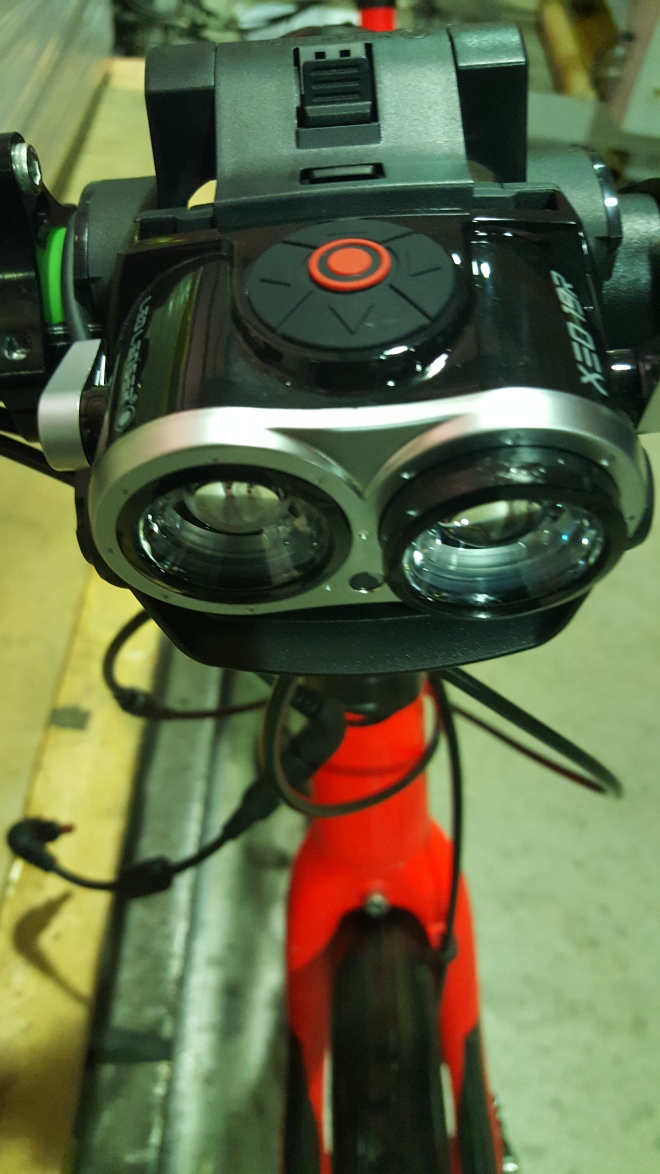
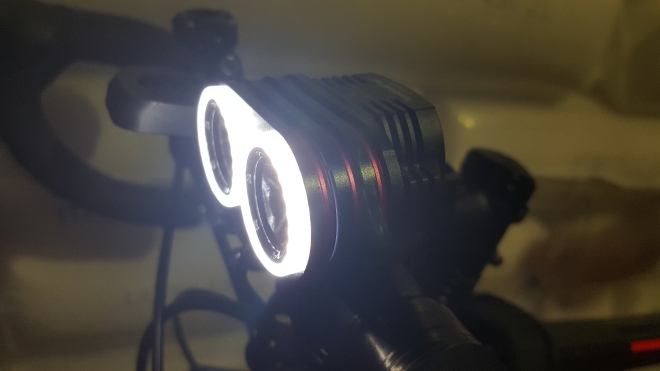
Everything fits easily and is very secure. The two silver levers (one each side of the light) allow you to alter the focus of each light. Move forward for a ‘spot’ light or back for a very broad spread of light.

The multi button on top of the light allows you to control the lights either together (pressing the orange central button) or separately (left button for left light, right button for right light). The rear button (if pressed for five seconds) locks the unit for travel purposes. The front button (if pressed for two seconds) activates ‘BOOST’ mode which is a eye watering 2,000 lumens.

I had a quick play with the light to get used to setting it up. It’s quite simple with the light to hand…

One press puts the lights(s) on low setting. This is approx. 300 lumens. Two presses puts on high setting which is approx 1000 lumens. Three presses puts on ‘Optisense’ mode. This is ideal for walking as it senses when you look down and dips the light output (for looking at a map or GPS). Four presses puts on ‘flash’ mode. Five presses switches off.

The are three other settings via the button. ‘Lock’ and ‘boost’ have been explained ^^ above. The last is ‘Variable’. If you hold central button (for both lights) or either left button or right button for two seconds the lights(s) will allow you to decide how bright you want them. Lowest setting is 150 lumens upto 1000 lumens.

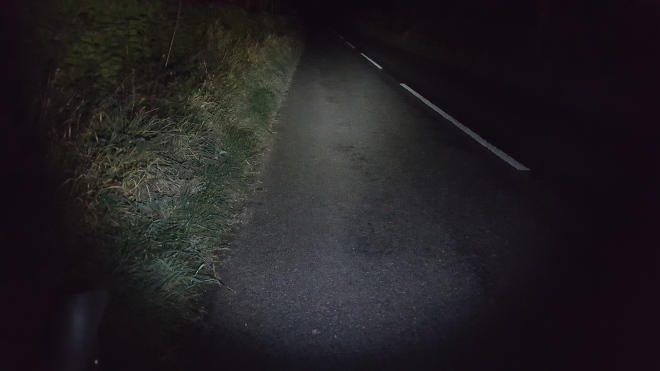
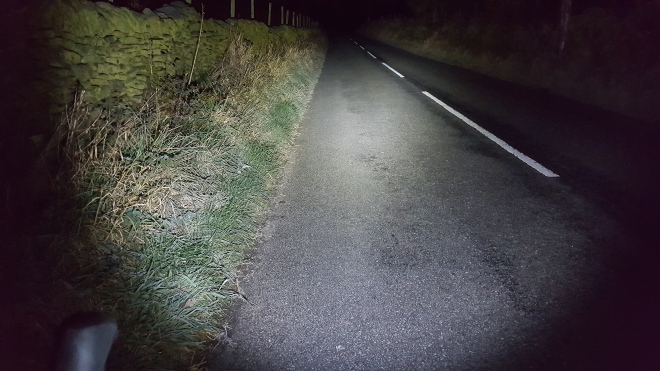
After ten minutes of playing around the myriad of settings all make sense and from there on it’s simple to set the light up exactly as you want it. For me, using on roads at 4.30am in the Peak District (some unlit) I decided to try two different settings.

This is just off Woodhead Road at 5am in the morning. No street lights, so literally pitch black. A great place to compare the Lenser settings. Daft I know, but to get an idea of just how dark it is this is a photo taken just before I switched the Lenser on …

20161101_051108

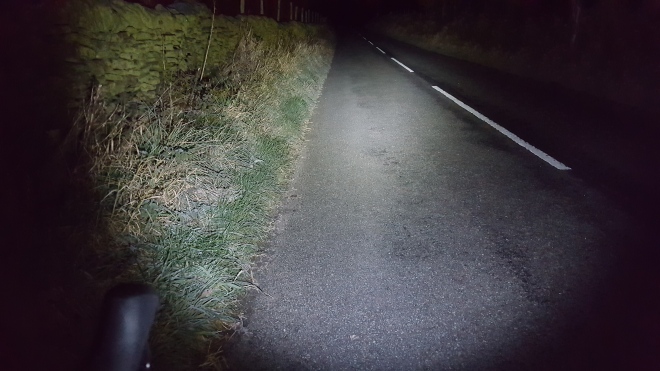
I had the left light on setting two –  1000 lumens (and spotlight). I had the right light on setting one – 300 lumens (and broad spread).

20161101_051129

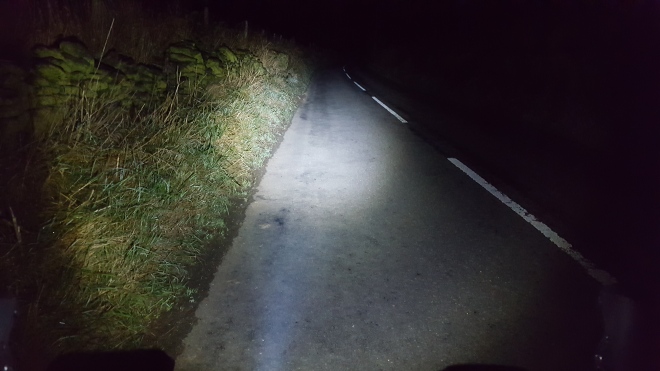
This setting was perfect for my country commute and gave a burn time of five and a half hours. I found this ideal as it gave plenty of forward light when moving fast downhill (30+ mph) or on unlit roads with the 1000 lumen spot, yet lots of peripheral light from the 300 lumen broad light. A great combination.

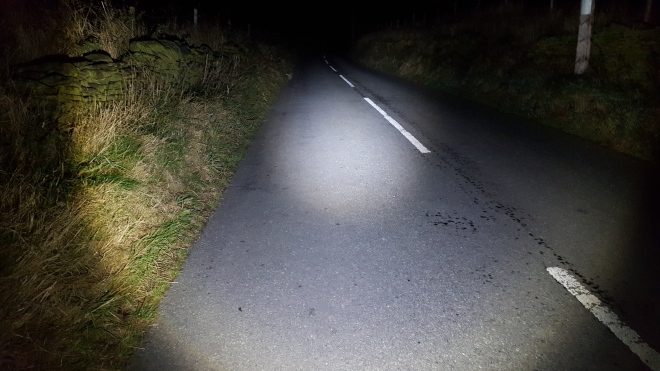
I tried both lights on 1000 lumens. One Spotlight and one broad light. You can see the additional light. In truth this was too bright when I got onto roads with some street lighting despite the Lenser being tilted down toward the road.

20161101_051049

This setting gave a burn time of just under 3 hours … which also included me playing with the light to get used to settings and testing ‘boost / 2000 lumen’ mode quite a few times.

Speaking of which this is the 2,000 lumens. The picture doesn’t so it justice. I haven’t yet got a burn time for this as I will need to test it off road. It’s far too bright for using on road and will see me getting abuse!

20161025_050926

Overall the power of the light and burn times have been very impressive. I still intend to use the helmet mount for an off road night ride (I’ll update the review with that), but I’m confident the light is good enough for our Mountain Mayhem race. One charge will be sufficient for the two or three night laps.

I did run the Lenser alongside my Hope R2i to compare. Hope say the R2i is 1000 lumen. It has been measured above that (1,300 to 1,400) and is a perfect commute light (as it’s battery is built in so no additional pack). With the Lenser set on 1000/1000 lumen the Hope was enveloped and added nothing. At these settings the Hope would run out after one hour and the lenser would last for three hours.

It’s easy to see how the Lenser can run for 10+ hours on one charge by cycling through the settings. One light on low (300 lumen) and one on flash would be fine for most urban requirements and would increase burn time significantly.

Downsides – Only one. There are no obvious warnings that the light is running low. Not a biggie as you soon get used to burn times and it’s very simple to recharge after every ride, but worth a mention.

Would I recommend the Lenser – Yes. I’ve been impressed enough to buy the unit I’m testing.

Continental GRANDSPORT Race Tyres

HighPeak Cycles have asked me to test and review a pair of Continental Grandsport Race tyres (25’s). I have a couple of Cannodale roadbikes and have switched them both from the OE Schwalbe Lugano (25’s).

The Continental tyres have been supplied by Rob Scullion of Cambrian Tyres – so a big thanks to Rob for the opportunity to test and review the Grandsports.

I run Schwalbe Durano Plus (Smartguard) tyres on my Synapse Disc commute bike and Continental GP4000II on my Synapse Carbon ‘summer’ bike. Both are 25’s. The GP’s are a cracking tyre and my favourite by a country mile, so I’m hoping the Grandsport Race live up to my GP experience. I’m not expecting them to be as good as they do not have the grip/ sticky compound and are aimed at a more general road/ commute/ club riding market, but that spec should sit well on my Synapse disk.

The Conti tyres were supplied as ‘folding’ tyres and fitted easily in minutes with no issues. My first ride will be tomorrow (12/7/16) and I’ll update the review once I have covered enough miles to form a constructive opinion.

Out with the old (Schwalbe Durano Plus)

20160711_100154

And in with the new (Continental Grandsport Race).

20160711_134535

Update Monday 1/8/16.

I’ve been running the Grandsports for three weeks now. I’ve covered 373 miles on them in varying conditions from perfect warm, dry rides to awful torrential rain. Road surfaces have been poor (newly ‘dressed’ stone chippings) to ok. The tyres roll well and feel quick (which has shown with Strava segments) and have had plenty of grip. There have been no punctures, but I’ve kept the tyres topped up to 95psi which I’ve checked twice a week and at present I’m still riding in daylight (so can see road debris) other than my first 30 minutes at 4.30am.

Initial thoughts are that the tyre is very impressive. I’ll keep an eye on wear as it’s too early to comment on that just yet – but they grip well and do inspire confidence so I’m very happy with them compared to the other tyres I’ve used.So far I’m happy using them for commuting and general riding.


Duck Smart ‘mud slider’

Another of the flurry of afterwash sprays which claim to make cleaning your bike easier. This one works as well as others do. That’s not intended to be insincere, but this type of product is now well established on bike shop shelves.

20160502_125225

It’s simple to use. Clean your bike thoroughly, but DO NOT dry it. Whilst wet spray the Duck Smart onto the frame. Make sure you cover it well and leave to dry. It will dry with no streaks and the next time you come to wash your bike the mud will slide off. Well, maybe not slide off, but from experience it does make the bike easier to clean so does what it says on the label.

The only downside to this particular Duck Smart brand is that once the bike is dry it leaves the paintwork dull and any scratches or blemishes stand out as a result.

Another product I reviewed last year (Pro Green Aftershine 101) does virtually the same job, but leaves a shiny gloss finish on the paintwork. Both Duck Smart and Aftershine offer similar results, but having used them both I prefer the Pro Green Aftershine 101 because if the gloss finish it leaves.

Knog Blinder Front and Rear LED Lights

Updated on Monday 13th June 2016 – See foot of the page. 

Last week I got a call out of the blue from Jamie at my local shop High Peak Cycles asking what time I commute into work in a morning. After reassuring me he was not after a new stalking target and told him I leave the house at 4.20am so I can get 1.5 hours in before work. Jamie was pleased as this gave me the perfect (dark) conditions to test the new Knog Blinder lights*. I would have an hour of darkness and a few roads in the Peaks with no streetlights to put them through their paces.

*The kind folk at Silverfish UK sent a dealer gift pack out to High Peak Cyles which was a pair of the Knog Blinder Lights in a very nice presentation case. Silverfish and Knog are now one and the same and being pro-active on getting feedback on their products directly and via social media. Via The Angry Biker Blog we will be doing both for them.

First Impressions.

Once the lights are unpacked initial impressions are that they are very well made. They look true to their claimed 100% waterproof design. The USB charging point is manufactured within the frame of the light. It’s clever. Design and looks have clearly been something given plenty of attention.

I run two lights (Moon and Lezyne) front and rear to make sure bleary eyed motorists and half asleep pedestrians don’t miss me. One fixed and one ‘secondary light’ set on flash/strobe. The Knog lights look a perfect ‘secondary light. The front is 80 lumens with five modes and the rear is 44 lumens with 5 modes. The Knog front light is on the left in the picture below …

In Use

The lights are easy to fit in place on the bike. One press of the button switches the light(s) on and further presses cycle though the different light patterns. I chose full light (not flashing) for the front and ‘standard’ continuous flash for the rear.

Next to the 300 lumen front Moon light which was set on low fixed beam the Knog was very bright. I checked this at 4.30am in pitch black and the Knog panel of white LED’s was incredibly bright. Just what you need. I found the same comparing the rear light. The Knog rear panel lit up the road and scenery with it’s red flash. So far so good.

I did try a couple of miles running just the front Knog light. It was fine where there were street lights, but as soon as they became more spaced or disappeared on country roads the light beam was too short to be of any use and I switched the Moon back on. This just reaffirmed that the Knog is perfect for it’s intended use. A secondary light, a ‘get me home light’ when you stay out longer than intended or a commute light where you aren’t venturing onto dark unlit roads.

Burn wise the front light set on full lasted about two hours. I thought that was good and could see that if you altered to low/flash pattern the burn time would be much longer. The small red light which come on when you charge also comes on when the light is low on battery. It lasted approx. 15 minutes longer once the warning light came on.

The rear light (on ‘high’ flash) lasted three and a half hours and still had charge. Again, this was very good and I couldn’t forsee any issues with burn time on the rear light.

So, design, ease of use (charging and on the bike)  visibility of lights and burn time all get the thumbs up.

I did have one issue though. It’s worth mentioning as it’s a quick fix. After fitting the light onto the rear seat post ‘out of the box’ when I pushed down on the pedal my leg caught the clasp of the light strap …

You can see the silver clasp in the above left picture. The clasp acts not only as a means of securing the strap, but as protection to the USB charge point which means it protrudes out a few millimeters. During my three commutes my leg would brush the light meaning it always ended up at an angle. High Peak Cycles told me to keep hold of the lights for a longterm test, so I took them out on another ride. This time I fitted the smallest rubber strap to the light.

20160430_123241

Putting the light on using the smallest strap felt like it was too tight at first, but the clasp clicked into place reassuringly. I went on a 30 mile ride which had me moving around the bike. I was still brushing lightly against the light, but as it was now much more secure it hadn’t moved by the end of the ride.

Conclusion

The Knog Blinder lights retail at £39.99 each which puts them bang in the right price range. The design is clever and they look and feel very well built. Whilst I didn’t get a long period of rain to test them in they look very well sealed and very smooth so I would expect the 100% waterproof claim to be correct. The lights are VERY bright with good large panels helping visibility. Easy to charge, fit and use. I particularly liked the front light as it tucks away on the front of your bars whereas other lights tend to sit on a bracket or on top of the bars so are more intrusive. I’ll update the review once I’ve used them over a longer period of time, but so far so good. Very good indeed.


Update – Monday 13th June 2016. 

Despite having done my Fred Whitton challenge, I’m still out of the house at 4.30am as I’ve got used to riding on the quieter roads and trying to squeeze 20-25 miles in before work. Daylight is nearly here (currently about 4.45am/ 5am), so the Knog Blinders are perfect for the conditions. I don’t need ‘full’ lights, or lights for me to see – just something nice a bright that makes me stand out to the odd car/ truck I see who’s driver has not yet fully woken up and needs a reminder not to run me over. I run the lights for one day (so morning/ night/ morning) then re-charge. That’s just under four hours riding. The front light is still on, but the rear dies (on flash mode) during the last part of the last ride. I still run two rear lights anyway (one fixed/ one flash) so I’ve no issue with that – and it’s very easy to charge the lights daily anyway if I were bothered. The Knogs are still very bright, easy to put on/off the bike (for charging) and easy to switch on and move through modes. They do look the part too. I’m still very happy with them and have no issues to report over two months of use.

The Angry Biker completes The Fred Whitton Challenge 2016

Updated 29/4/16 and 11/5/16 and 13/6/16. Please see foot of the page …

When you mention that you have entered the ‘Fred Whitton Challenge’ to a fellow cyclist or (fell) runner who has entered a few races and sportives in their time you usually get a knowing look and an understanding nod. It’s not an event to be taken lightly. It is 112 miles of pain and +/- 14,000 feet of climbing (even more pain). “Challenge” is probably an understatement given that it is considered one of the toughest one day cycling events you can enter.

hardknott

This years event takes place on Sunday May 8th 2016. In order to guarantee a place The Angry Biker did a ‘Charity Pre-Entry’. This also guaranteed Macmillan Cancer Support a minimum of £250. Macmillan is an incredibly good cause, so please add a small donation on my Justgiving page if you are able to … The Angry Bikers Macmillan Justgiving Page for ‘The Fred 2016’.

I’ll be riding ‘The Fred’ with a good friend Dave Allan who talked me into entering the Fred. He has completed it once before (2014) and needed a mug mate to share the pain this year. We are now both diligently training in preparation for the gruelling day in May. This is a graphic of the climbs. The toughest (Hardnott) is saved for the 98 mile point!

Fredgraphic

And this graphic gives you an idea of the complete circuit we will be riding.

Fred Whitton

The Angry Biker has entered ‘The Fred’ riding under High Peak Cycles of Glossop. Jamie, Charlie and Stuart have entrusted The Angry Biker with product reviews, looked after his bikes at the drop of a hat and put up with his moans and sarcasm in the shop, so it follows that high Peak Cycles should be represented.

Entry2016red

Training is 100+ miles of road work (+/- 9000 feet of climbing) over four weekdays and then a 10 or 13.5 mile fell run (+/- 2 to 3,000 feet of climbing) at weekend. If you want to follow my training on Strava then click on ‘request to follow’ … The Angry Biker on Strava

Thanks for reading. Wish me luck – and once again – THANKYOU to everyone that sponsors me.

29/4/16 – With just over a week to go the weather seems to be trying to hinder my final preparations. I’ve been commuting to work in -2 temps with some snow and rain and now (Friday 29th) it’s more snow. May in two days and we have snow. Terrific! Not. 

Overall training has gone well. I’ve maintained riding 100+ miles in my three day commutes and have had lots of weekend hill sessions over the Snake Pass and Winnats Pass, culminating in an 82 mile ride with 9,000 feet of climbing a couple of weeks ago. I’d planned to do another today, but snow stopped play … for now. I’ve also been running half marathon fell runs with 2,700 feet of climbing to strengthen the legs up, so I’m hoping I’m well prepared as ‘shit just got real’ ! 

20160421_200336

Charity wise I have raised £926.00 so far. With a week left it would be fantastic if I could break the elusive £1,000 barrier online, but we will wait and see on that. Whatever total I end up at I’m sure it will be well received by the fantastic Macmillan Cancer Support. 

My preferred bike (The Cannondale Carbon 105 Synapse) is serviced and ready and I’m now the proud owner of my first every cycling Team Shirt courtesy of High Peak Cycles who have been great with bike support and sponsorship. 


20160422_182440

——————————————————————–

11/5/16. Job Done! 

Brutal.

F’king Hardknott.

Elated.

Think those few words sum up The Fred Whitton Challenge! Ha ha. It’s reputation as one of the toughest one day events is well deserved. The organisation is superb, the camaraderie between riders brilliant, and F’kin Hardknott (as it became known to me) was brutal. I was also blown away with the hundreds of people who turned up and lined streets and climbs ringing cowbells and cheering us riders on. Total finishing time (including stopping at the two feed stations) was 7 hours 29 minutes. Total moving time was 7 hours 2 minutes. Very pleased with that.

‘The Fred’ is challenging throughout, but the fact the hardest climb(s) are left until 98 miles in means you are mindful of that all the way round. Carefully trying to maintain good time, but keep something in the tank for the 20% and 30% gradients you know are coming. I was lucky that my riding partner (Dave Allan) had ridden the Fred in 2014 and is a regular racer. His experience/ knowledge of the route and riding plan to ensure a good time were invaluable.

In truth though – nothing could have prepared me for Hardknott. You have to ride it to understand. I think it’s probably 30% mental strength and 70% physical. Some riders were beaten before they got half way up. Either stopping completely, falling off, passing out (in the heat) or just walking their bikes up. There was a headwind which didn’t help, but you were so far into ‘the zone’ that even shouting “Rider Coming through” to the lads pushing was hard work. Making the top, riding all the way – past people lying down and pushing bikes gave a real sense of achievement. That only lasted as long as it took to get a view of the next very steep sting in the tail …Wrynose Pass.

We rode the strength sapping undulating road toward Wrynose. If there was anything left in the tank then this last climb wanted to steal it from you. You could see people pushing bikes, and the steep elevation of the climb ahead as you approached. Like Hardknott it’s a daunting site after 100 miles, but fortunately a lot shorter so you just have to hit it as hard as you can.
We went at Wrynose and span steadily to the top, wheel to wheel and the greatfuly grabbed a bottle of water from a lady handing them out as you went over the summit. Now we had 12 miles to the finish. The last five of those were quick and powered by a mix of adrenalin and elation that we were minutes from finishing. Crossing the finishing line, again lined with supporters cheering us home was a fantastic feeling. Three days later and I’m still wearing the same grin that spread across my face with a great feeling that I’ve accomplished something very special.


13th June 2016

Just one last update on the final total I raised for Macmillan Cancer Support. It ended up at £1,515.16 which I’m really chuffed with. Thanks to everyone of my sixty supporters who donated money to Macmillans. You are all stars and I’m sure Macmillans will appreciate every last penny.

Cannondale Synapse Tiagra Disc 2016

*Updated 15th February 2016 and 13th July 2016 – See notes in RED at foot of the page*

After killing my trusty Fondriest hack bike I needed to sort a replacement out. I decided on a sensible (for me!) sub £1000 budget to get a bike, full guards and any other bits required (pedals, bottle cages etc). I wanted an Alloy not carbon frame and the Synapse geometry as this bike is a dedicated winter/ bad weather bike so needs to be comfy, durable, weatherproof but also a bit of fun to ride.

20160115_122248

My Carbon Synapse 105 is VERY comfy and feels very quick. It is a really well balanced bike and I love getting out and riding on that. So, it was a given that I’d go Synapse again. After checking specs out I decided to go Tiagra and disc. (The Cannondale Synapse Tiagra Disc RRP is £849 so well below my budget). Shifters are the new much improved Tiagra 4700 which is very similar to the Shimano 105. Same direct shifter cable routing, but ten speed rather than eleven.  Hopefully ten speed will give more durability. Whilst the brakes are ‘only’ cable discs rather than hydraulic they should hopefully do what I need of them. That is, not destroy pads in 1-2 weeks (as the Fondriest did) and not destroy a wheel (rims knackered) after 12 months (again, as the Fondriest did).

20160115_122310


So, bike chosen and ordered on 4/1/16 through High Peak Cycles  in Glossop, Derbyshire. I just had to patiently wait for it to arrive. That bit wasn’t easy! I got the call from Jamie last week to come in the shop on Friday 15/1/16. The bike had arrived Thursday. High Peak built it up and wanted me to go in to get it fitted.

20160115_122301


Have to say, I LOVE the colour. Far better than the Cannondale pics suggested. Whilst officially ‘Red’, its more of an orangy red. With the black detailing it looks brilliant.


With me eager to get out and ride my new bike, Sods Law jumped in and we had snow and ice arrive on Saturday. I had to wait for my first ride (a commute to work) this morning (Tuesday 19/1). Took my normal route – 16 miles before work with Jamies warning to take it easy to bed the disc pads/brakes in echoing in my mind. I treated it as a ‘shakedown’ ride to get a feel for the bike and see what will need altering.

First thoughts are:

After initially having little bite (as expected), the disc brakes felt fine about five miles into the ride. Smooth braking and at least as efficient as the rim brakes I’m used to. Still need kids gloves to get them bedded in properly and not glaze them over, but signs are good as I expect they will get even better. 15/2/16 – After four weeks / 530 miles the disc brakes have proved a revelation. Original pads are still biting strong and the stopping power and consistency are far superior to rim brakes. 

The Lugano 25’s tyres are a comfy tyre. Moreso than the 23’s that came supplied with my carbon Cannondale.  They will be fine. 15/2/16 – After two punctures during my first week commuting I took the Luganos off and put some Schwalbe Durano Plus 25’s on (with smartguard). Although slightly heavier than the Luganos the puncture proof layer more than makes up for that.

Nothing much appears to be rubbing (mudguards, pads on discs), so all good in that respect. Chain does touch the front mech in big ring fifth gear + so I’ll see if that keeps up and get it tweaked if needs be. 15/2/16 – Nothing rubbing now. Bike did go into High Peak Cycles for some warranty work, during which it had a quick check over and complimentary service, so I’m sure a bit of adjustment sorted this. 

Gears are nice and positive with slick changes. Feels very much the same as the 105 on my Carbon Synapse which I’m very pleased about. They look identical too. 15/2/16 – Week three of commuting and when setting off at 4.30am I couldn’t move onto big (front) ring. Took the bike into the shop later that morning assuming it was a cable issue. On inspection the left shifter had failed. High Peak Cycles ordered a new shifter. From diagnosing the fault to me picking the bike up was 24 hours. Amazing service and just goes to confirm why we should covet fantastic local bike shops like High Peak. 

I’ve got the seat *just* slightly too high. I felt my hips ‘roll’ a couple of times. No discomfort, but I’ve dropped the seat by a few mm to try on the way home and see if it is better. 15/2/16 – Constant small adjustments found the perfect position. This was confirmed in no small way with last Fridays ride around the Peaks. 62 miles and 6,500 feet of climbing and comfortable for the full ride. 

Saddle position/ bars/ reach is all good. May need to drop the front by another two or three shims sooner rather than later. Whilst it’s comfy, I feel a little ‘sat up’ on the bike as I’m used to a lower position on my carbon Synapse. 15/2/16 – Have resisted changing this so far.

The bike will be clocking up roughly 80 miles a week commuting. It will also get longer ride at weekend if the weather is poor and I’m not fell running. I’ll update this review once I’ve got more mileage under my belt, with particular reference to the mechanical brakes and how they fair under the pressures of commuting. I’m also interested to see if the Tiagra 4700 is comparable to 105 longterm.  First impressions are good. Very good. 15/2/16 – The Alloy Synapse has now covered 532 miles over four weeks / 15 rides. Initial ‘very good’ impressions are the same if not better. The bike is comfortable, durable and quick when needed. It’s done 10 miles runs and 60+ mile runs, covering some of the top 100 UK climbs in the process (Holme Moss and Winnats Pass to name a couple). It’s recorded it’s first KOM, yet takes the strain of commuting 80-100 miles a week in the wind, rain, sleet and snow we’ve had with no issues. The disc brakes in particular (thus far) have been fantastic. Long may that last! 

————-

Update – 13th June 2016.

I’ve now covered 2,000 miles on the Alloy Synapse in the five months I’ve owned it. They have mainly been in the bad weather as I’ve dropped onto my carbon Synapse for dry weekend rides and some (dry) commutes. The bike gets a ‘proper’ clean at least once a week to help with general bike longevity. The full guards are something I’d never be without on a commute bike. It saves the bike/ components/ rider from so much road spray that it’s a no brainer. The bike isn’t the lightest to start with, and with full guards and other commute bits strapped to it you can feel it’s a bit weighty. That’s no bad thing though as during blustery commutes it’s felt more stable than the carbon synapse does – and after a weeks commuting on the alloy I do appreciate how light a carbon roadbike is. In general the alloy Synapse has performed very well. It’s done exactly what I wanted and given me very little need to visit the bike shop. Over the months it’s become clear what the bikes main strengths and weaknesses are …

Strengths.

  1. The Tiagra 4700 groupset. Whilst not as smooth as the 105 on my carbon bike it’s been pretty much faultless. I’d initially wondered if opting for tiagra in favour of 105 would be a mistake but it hasn’t been. The new Tiagra is spot on.
  2. Disc brakes. Even though they are ‘lowly’ cable brakes they have been superb. Excellent bite in the (very) wet conditions I’ve had at times commuting. None of the awful scraping sound as the grit destroys rim brakes – just efficient braking as soon as the initial water is cleared. I’m amazed that the pads (checked by High Peak Cycles on Friday 10/6/16) still have plenty of life after 2000 miles. I’m 100% converted to discs. Bugger garlic bread, they are the future! Ha ha.

Weakness.

  1. Wheelset. To put it bluntly the Maddux RD3.0 wheels supplied with the alloy synapse are crap. That’s the politest way I can describe them. A spoke snapped on the rear wheel not long into ownership. High Peak Cycles sorted that for me and the wheel has been ok since. The front is another matter. The wheels do not have cartridge bearings and have seals about as useful as a chocolate teapot. High Peak Cycles have replaced bearings twice, but this only lasts for a week or two, then the awful noises start again as the wheel/bearings dry out. Rather than persist with this High Peak Cycles did me a deal on a set of Mavic Aksium wheels (fitted on 10/6/16). Hopefully they will be a more durable for commuting. I’m very disappointed with Cannondale putting a pair of wheels that haven’t lasted five months on the bike, but very pleased with the way High Peak Cycles have dealt with the issue.
  2. The seat. Soon to be replaced. Looks nice and I’ve stuck with it through all weathers, but it is still the uncomfiest seat I’ve ever had the misfortune to sit on. It’s down to the shape of the seat which is slightly slimmer and taller than any other I’ve used. After two days commuting it feels like it wants to ‘Bone Tomahawk’ me. (Watch the film with Kurt Russel and you will know what I mean when you see ‘that’ scene).

These are the new Mavic wheels being fitted. Will working and Jamie assuming the ‘geezer’ pose for the camera. I will be trying the wheels out for my first commute tomorrow (14/6/16) and will add an update in due course …

20160610_144432

And some pictures taken after my wet and windy commute into work on Tuesday 14/6/16 to show the new wheels off …

Pro-GreenMTB Bikewash and After-Shine101

I have a cleaning regime for my bikes. I need one with commuting as I found the hard way that it is much easier to keep bikes clean on a per ride or weekly basis than let them get really dirty and then spend hours trying to get rid of all the baked on filth. With this in mind I was very interested in the Pro-Green Bikewash. Particularly as it claims … “No brush or sponge required by allowing Pro-Green to soak and penetrate dirt and grime for upto 15 minutes before rinsing off“.

Sounds excellent so far. There is an issue though. The product assumes you are happy firing a pressure washer at your mountainbike.

“Remove excess soilage from your bike first using a pressure washer

“Allow 15-20 minutes soak time before rinsing off with your pressure washer“.

20151214_074841

I used to ride a Yamaha WR450 Enduro bike. I trail rode and entered the WOR Off Road Races. A days racing or trail riding in North Wales saw the bike return wearing a new coat of mud and dirt. I used Putoline cleaners which were much the same as this. You *had* to use a pressure washer as a hosepipe would not clean the mud off the bike. It was ONLY used reluctantly on areas where it would not damage the bike as it was easy to blow decals off the bike or strip grease from bearings. So, there is no chance I’d put a pressure washer lance anywhere near a delicate mountainbike.

I decided to crack on with testing the Pro-Green, but using a strong hosepipe which has proved more than adequate for cleaning my mountainbikes, roadbikes and cars where I don’t trust the power of a pressure washer.

I decided to try the Pro-Green out on my Mondraker Dune (I’d just ridden a wet Roman Lakes route) and my Fondriest winter road/hack bike (which had just done 75 miles commuting in mainly wet conditions over three days).

Before:

I left the Pro-Green for a full 15 minutes. This was annoying as I’d probably have cleaned the bloody bike by now if I’d just got on with my normal wash routine. Still, Keep with the instructions. I then spent a fair time cleaning the bike off with the hosepipe.

After: 

All looks ok, but on close inspection the bike isn’t nearly as clean as it needs to be. I resisted the urge to wash the bike as I normally do, and instead got degreaser our for the chain and block as I wasn’t prepared to leave them dirty. I sprayed the bike with Pro-Green After-Shine101 whilst the frame was wet (as directed) and left the bike to dry. Once dried I had a close look at the Mondraker. It looked dirty. On the plus side the After-Shine had worked well on the frame and that did have a glossy look to it.

You will notice no ‘After’ pictures of the Fondriest. Thats because I had to wash that ‘my way’. The Pro-Green Bikewash didn’t get near the roadgrime. 20 mins later the bike was washed and degreased and looked like this:

Conclusion

The Pro-GreenMTB Bikewash isn’t a replacement for washing and degreasing your mountainbike. At best it’s a rather pointless prewash. You need to use a lot of it per wash too. This is how much was used just to clean off the Mondraker …

20151211_155029

So, one bottle will probably give three or four (at the most) washes. I personally don’t see the point. Unlike cars (where you can pre-wash with snowfoam) there just isn’t the need for this with mountainbikes. The Bikewash won’t do anything with road grime/oil, so despite it’s green credentials you still need to reach for the trusty degreaser to reach the parts that Pro-GreenMTB bikewash just won’t touch.

One positive was that the Aftershine-101 did what it said on the tin and left the frame looking glossy. But, I prefer to dry the frame, chain, discs off to get rid of excess water so prefer to not leave the bike wet to dry off (as is required for the Aftershine to work).

So, it’s a no from me. I definitely don’t want to pressure wash my bike(s), the Pro-GreenMTB Bikewash leaves the bike dirty, delays you by upto 15 minutes waiting for it to work and the end result leaves you washing the bike again anyway.


Mondraker Dune RR

Mondraker Dune RR

Over the last year I’ve been using my roadbike and fell running. I started to get an itch to introduce some mountainbiking so dusted off my Intense Tracer. In it’s day the Intense was a peerless bike, but it’s day was several years ago. By coincidence Jamie at High Peak Cycles had a Mondraker Dune RR in the shop. He had intended to ride it himself, but just never found the time. The Dune RR is ‘Enduro’ spec which is perfect for riding in the Peaks.  I took the Mondraker on an ‘extended demo ride’, telling Jamie (as I always do) that I wasn’t really wanting to buy a new bike, it was a bit too expensive, I’d be wasting his time, maybe in a few months …

So, I bought the bike. Yes, I’m weak.

Initial observations on the Mondraker.

Quickly setting the bike up I was impressed with the spec. I couldn’t see anything I would need to add to the bike. That should be the case with the RRP of this bike just under four grand, but even so it’s comforting to know that there will be no need to feel the need for ‘upgrades’ as it’s all there right down to comfy lock on grips. Spec gives front and rear Fox, dropper seatpost and decent brakes and drivetrain.  Quality set of Easton 27.5” (650b) wheels and Mavic tyres. I was sceptical about the 800mm wide Raceface bars and the ‘forward geometry’ frame (there is literally no stem) but looked forward to seeing how it performed.

Seat post set and everything else felt ok. Jamie had set the bike up for him and as I’m a similar build (and mountainbikes don’t need the same precision as roadbikes) I decided to see how we went. Only thing we did was quickly alter the suspension settings to suit me as I sat on the bike.

First rides

I did a couple of Peaks rides I know well. Good local rides with a nice mix of terrain and some challenging climbs. This would give me a good idea on whether I would get on with the Mondraker.

On anything flat ‘ish’ the Mondraker is a very plush, comfortable bike to ride. For me it comes into it’s own when climbing. I’m sure the 27.5” (650b) wheels play a part in that (compared to the 26” wheels I was used to on the Intense) and the fox suspension, but a major factor has to be the ‘forward geometry’ frame set up which ensures your weight is over the front wheel. It keeps traction with the front, but also means input from the wide 800mm bars is immediate. This translates to being able to keep weight on the back wheel (for traction) without having to move around the bike much. In turn, climbing is easier as the Mondraker rides over ruts, rocks and obstacles with no fuss and without the need for any out of the saddle heroics. Less effort = Not as knackered, which is always a good thing.


Riding downhill the Mondraker is far quicker than me. I run out of talent a long time before the bike runs out of speed! That said, quick press of the button to drop the seatpost  (is the dropper post the best inventionever or what?!) and we are away. The comedy 800mm wide bars show they are practical as they come into their own on fast twisting singletrack and ruts where you are changing direction quickly. Watch out for narrow bridges though as I’ve found a couple that must literally be 795mm wide leading to comedy moments trying to ride across! The ride downhill is still plush. Brakes feel good and a quick squeeze will lock the rear as and when you want. No fade or pump on the rides I’ve done since (more Peaks rides and a couple in North Wales).

Each ride I’ve gone done I’ve got quicker as I’ve gelled more with the bike. I’m trying to get out on it once a week. To give you an idea of how much fun the Mondraker is to ride – I normally go out for a drink with my brother on a Thursday night. I’m ducking that so I’m fresh for a ride on Friday afternoon. Yep. Bike before beer. Unheard of!

Problems

There have been some, so worth mentioning.

The Mondraker is supplied with SRAM. On the first ride the rear mech locked out. I was able to sort it and ride home, but High Peak Cycles ordered a new mech and replaced it to ensure it wouldn’t happen again. Hats off to them for the no messing about approach.

The rear Easton wheel developed some loose spokes after the third ride. High Peak spoke to the supplier who said they have no record of issues with this wheel set. It’s a good quality set retailing at around £600 so after rebuilding the wheel I was told to keep an eye on it and report back. I’ve not had a problem since and now include checking spokes as part of my post ride clean and fettle.

The bike has developed a reluctance to switch from the big to small ring on the front. If there is *any* load when you press the shifter then it won’t drop onto the smaller ring. Jamie has fettled it and all appears perfect on the stand, but the issue persists out on the trail. I’m putting it down to the SRAM OE system on the understanding that SRAM is … well … a bit shit. I’ll get my head around it so it’s not an issue but maybe consider a single front ring conversion before the good weather arrives in 2016.

Conclusion

I’m impressed with the Mondraker. Very good spec so I don’t need to throw money at it. You can just get on the bike and ride it. A lot. It has a plush ride with good feedback, makes me look fast downhill and comes into its own climbing. And I like climbing! (Good job living in the Peaks). The teething issues were not/ are not significant and two were sorted straight away by High Peak Cycles at no cost which was great. The only thing I’ve changed is the rear Mavic tyre. I appreciate tyres are a personal thing, but I didn’t like it in the wet mud, so I’ve switched it for a Maxxis High roller II which I rate highly. (I’ve reviewed that separately).